Showing posts with label car parts. Show all posts

Thursday, 23 March 2017

Symptoms of Bad or Failing Intake Manifold Gaskets


Common signs include the engine constantly overheating, coolant leaking, engine misfires, and a decrease in power, acceleration, and fuel economy.


The intake manifold gaskets are some of the most important gaskets found on an engine. Gaskets are the seals placed between engine components before they are assembled in order to provide a reliable seal. They can be made of paper, rubber, metal, and sometimes a combination of the three.

The intake manifold gaskets are responsible for sealing the intake manifold against the cylinder head(s). Apart from sealing engine vacuum, certain designs will also seal engine coolant. When the intake manifold gaskets have an issue, they can cause drivability problems and even engine overheating. Usually a faulty intake manifold gasket will produce a few symptoms that can alert the driver of a potential issue.

1. Engine misfires and decrease in power, acceleration, and fuel economy
One of the most common symptoms of an issue with intake manifold gaskets is engine performance issues. As the vehicle acquires mileage, the intake manifold gaskets may wear out and eventually leak. This can cause major performance issues, as the intake manifold gaskets seal engine vacuum and pressure. A vacuum leak caused by a bad intake manifold gasket can throw off the engine’s air-fuel ratio and cause engine performance issues such as misfires, a decrease in power and acceleration, a reduction in fuel efficiency, and even stalling.

2. Coolant leaks
Another symptom of a faulty intake manifold gasket is coolant leaks. Some intake manifold gaskets also seal engine coolant, and if the gasket wears out it may lead to a coolant leak. This may produce a distinct coolant smell, along with steam, and drips or puddles of coolant underneath the vehicle. Coolant leaks should be addressed as soon as possible, in order to prevent them from becoming a greater issue.

Engine overheating is another symptom of a possible issue with the intake manifold gaskets. A coolant leak will eventually lead to engine overheating when the coolant level drops too low, however there are instances where overheating can occur without any visible leaks. If the intake manifold gaskets leak coolant into the intake manifold the engine may overheat as a result, without any visible external leaks. Any coolant leaks should be addressed as soon as possible to prevent the possibility of serious engine damage occurring due to a bad intake manifold gasket.

While a faulty intake manifold gasket will produce symptoms that quickly alert the driver of an issue, there can be instances where a leak is difficult to detect. If you suspect that your intake manifold gasket or gaskets may be having an issue, have the vehicle inspected by a professional technician from AutoFactorNG to determine if the gasket should be replaced.

Tuesday, 7 February 2017

Symptoms of a Bad or Failing Alternator

Common signs include having to jump start the car frequently, dim lights when operating the vehicle, or the Battery Light coming on.

The electrical charging system is one of the most important systems on any vehicle. The charging system is made up of several components, including the alternator and battery, that work together to supply all of the vehicle’s electrical needs. The alternator is what specifically generates the amperage and electricity required to meet the vehicle’s electrical needs, including keeping the battery charged.

Because the alternator plays such a vital role in keeping all of the vehicle’s electrical components powered, any problems with the alternator can quickly develop into problems with another system or component on the vehicle. Usually, a defective or failing alternator will produce a few symptoms that can alert the driver of a potential issue, allowing time for the driver to service the vehicle before a bigger problem occurs.

1. Having to jump start the vehicle on a regular basis

One of the first symptoms of a bad or failing alternator is the need to jump start the vehicle on a regular basis. It is the job of the battery to provide the power to crank the engine and start the vehicle, however, it is the job of the alternator to make sure that the battery stays charged. If the alternator is beginning to have problems or has failed, it will not be able to meet the vehicle’s electrical needs, including keeping the battery fully charged. A low or uncharged battery will not be able to keep up with the load required to start an engine multiple times, and will result in a dead battery. Continuously having to jump start the vehicle may be a sign that the alternator may not be charging the battery and is therefore unable to successfully start a vehicle.

2. Dim lights

Another symptom of a potential problem with the alternator is dim or flickering lights. If you notice any sort of flickering or dimming of the lights when operating the vehicle, it may be a sign that the alternator is not generating enough power to keep up with the vehicle’s electrical needs. The dimming or flickering may coincide with certain actions when operating the vehicle, such as dimming when pressing on the gas pedal, turning up the volume on the stereo, or turning on another light. This symptom may be indicative of an alternator that is unable to keep up with the needs of the vehicle’s electrical system while it is running, and when additional loads are placed on it.

3. Battery Light comes on

One of the most common symptoms of a problem with the alternator is an illuminated Battery Light. The Battery Light will usually come on when the computer detects that the system voltage has fallen below a certain requirement. This usually means that the alternator, or perhaps one of its internal components, has failed and it is no longer able to keep up with the vehicle’s electrical requirements, and it has been detected by the computer. An illuminated Battery Light also indicates that the vehicle is now running on limited battery life. Depending on the condition of the battery, and how long the Battery Light has been on, the vehicle should be able to run for a short amount of time before the battery finally dies. At that point, the vehicle will shut off and service will be required.

The alternator is among a vehicle’s most important components, as it essentially serves to provide the electrical supply for the entire vehicle. Any problems with it can quickly translate to problems with starting and running the vehicle, which opens up the possibility of being stranded on the road.

If you suspect that your vehicle may be having a problem with the alternator, or it is displaying any of the symptoms above, [have the battery and alternator carefully inspected] by a professional technician, such as one from AutoFactorNG. WE will be able to determine if an alternator replacement is necessary, or if another issue needs to be addressed.

Tuesday, 17 January 2017

Symptoms of Bad or Failing Stabilizer Linkage

Common signs include clunking or rattling noises from the tire area, poor handling, and loose steering wheel.


The responsibility of keeping your car stable and handling smooth under multiple driving conditions falls on the stabilizer linkage, or sway bar as it's often referred. This mechanical unit is attached to the body of the vehicle by way of a body mount with stabilizer bushings and the stabilizer linkage – which attach to the lower control arm of the front suspension and have bushings along the link for protection and to ensure a smooth ride. When the stabilizer linkages are starting to wear out, the symptoms can range from barely noticeable to significant, and if you don't have your stabilizer linkage replaced, can result in catastrophic damage to the front end of your vehicle and potentially an accident.

Noted below are a few warning signs that will let you know when your stabilizer linkage are starting to wear out and need to be replaced by an certified mechanic.

The stabilizer linkage attach to the lower control arm of the front end of most domestic and foreign cars and trucks sold in the United States. From time to time, the rear end will also have stabilizer linkage. However, the ones that cause the most damage are in the front and located right behind your left and right front tires. If you're driving down the road and you start to hear a clunking, rattling or metal-on-metal scratching noise, it is possibly the stabilizer linkage causing the sound.

The stabilizer linkage are supposed to fit incredibly snug, without any play or movement except between rubber bushings. When the links are worn out, the stabilizer linkage will begin to make these sounds especially when you're driving around corners or over a speed bump. When you hear these types of noises coming from the front end of your car, truck or SUV, make sure to contact a certified mechanic and have them inspect and replace stabilizer linkage and bushings. This job requires that both the driver and passenger side be completed at the same time.

Poor handling or loose steering wheel

Since the stabilizer linkage are attached to the lower control arm, steering and handling are also negatively impacted when they begin to wear out. Most of the time, the actual culprit are the bushings that are designed to take the majority of the impact and help to protect the metal parts from wearing out. However, the bushings also can cause extensive corrosion, especially if oil, grease or other debris becomes embedded on the stabilizer bar. The direct result of all of these issues is that the car or truck simply won't handle the same way. The steering wheel will appear to be "loose", and the body will sway from left to right more due to the fact that the stabilizer bar links and bushings are wearing out.

A great opportunity for car owners to be proactive about keeping their stabilizer linkage and front suspension protected from significant damage is to ask a certified mechanic to inspect them during a front brake pad replacement, tire replacement, or other front end work. When they look under the front end, they will also inspect the tie rods, shocks and struts, CV joints and boots along with the front stabilizer linkages, bushings and other front end components. Believe it or not, it's actually a good idea to have the front stabilizer linkage links and full bushings all replaced at the same time that other front end work is being completed.

This allows the mechanic to then complete an accurate front end suspension alignment; which properly sets the suspension straight, so that the car drives smoothly, wears your tires properly, and the car doesn't pull to the right or left when you are driving straight.

As with any front end suspension work, it's always best to have a professional and ASE certified mechanic complete your stabilizer linkage replacement. If you notice any of the warning signs or symptoms above, contact AutoFactorNG so they can inspect your stabilizer linkage and supporting equipment.

Wednesday, 21 December 2016

How to Diagnose a Shaking Steering Wheel

An issue with your car's suspension or drive system will cause a shaking steering wheel. A tire and wheel out of balance can cause a vibration.

During normal operation, your car should drive smoothly and consistently across the streets you navigate. As drivers, we barely feel bumps, cracks or imperfections in the roads due to the advanced technology that comprises the suspension and drive systems on modern vehicles. However, there are times when we feel a vibration in the steering wheel that shows up on certain roads, at a particular speed or anytime the vehicle moves forward.


Because there are multiple components on today's vehicles that can cause shaking in the steering wheel, trying to find the exact source can be frustrating and time-consuming, even for the most experienced mechanics. Add the fact that multiple front end components could be worn out or out of alignment at the same time, and you'll understand why the process of discovering the exact cause of steering wheel vibration can be a time consuming and extremely detailed process.

Part 1 of 3: Diagnosing tire and wheel balance issues

The most common cause of steering wheel vibration is due to tires and wheels that fall out of balance. Tire/wheel balance is the process of adding weight to the wheel after a new tire has been installed. Every tire that comes off the factory floor has some imperfections in the construction or the weight distribution, and requires weights to balance it.

The best way to determine if the steering wheel shaking is caused by your front tires and wheels being out of balance is to have a professional tire technician complete a balance check.

Typically the warning signs that lead to this issue include:


  • The steering wheel vibrates when the vehicle reaches highway speeds (55 mph and above)
  • The shaking progressively gets worse the faster the vehicle drives
  • The shaking goes away when you decelerate below highway speeds

You can also perform some inspections yourself to determine whether or not your tire/wheel balance is causing the steering wheel vibration.

Check the sides of your tires for marks. The most common cause of tires and wheels falling out of balance is due to the tire striking a curb. If you see scuff marks on the side of your tire, it's a good indication that the tire and wheel are out of balance. Hitting an object will shift the weight balance of the tire to where the tire struck the object.


Another simple check is to inspect the side of the wheel where the weights were initially installed. If you see a clean spot in the shape of a wheel weight on the side of your wheel, it's likely that the weight fell off. This check is hard to complete on the inside of the wheel, but if you can, turn the wheel to the left and inspect the inside as well.

Part 2 of 3: Diagnosing wheel bearing issues

The wheel bearings secure the wheel hub to the vehicle’s suspension. Inside the wheel bearing housing is lubricant designed to keep the bearings cool and reduce the buildup of heat as the wheel spins. Over time, the wheel bearings tend to lose lubricity, and if the bearings are not replaced in a timely manner, they can cause the wheel hub to loosen.

As the vehicle drives down the road, the loose wheel will vibrate, which may be felt in the steering wheel. If the wheel bearings are not replaced soon, they can break, causing the entire wheel/hub assembly to fall off the vehicle and create a dangerous driving situation.

There is a very simple test that any novice mechanic can perform to check whether or not the wheel bearings are causing the vibration. To perform this inspection, you'll need to follow these basic steps.

Step 1: Raise the front end of the vehicle on jack stands. Using a hydraulic lift or a jack and jack stands, raise the front end of the vehicle.

Make sure to jack the front wheel from the lower control arm or the side body mount.

Step 2: Check the tire/wheel for loose wheel bearings. As noted in the image above, the inspection for loose or worn out wheel bearings is rather simple to complete and is done by touch. Place both hands on the tire, preferably with one hand at 3 o’clock position and the other at 9 o’clock.

Push and pull the tire in and out with both hands. If you do this and hear a clunking sound, or the wheel moves freely while shaking the tire, it's a good indication that the wheel bearings are worn out and need to be replaced.

Step 3: Replace the wheel bearings or have a mechanic complete this task. If you have the right tools and experience, replacing the wheel bearings is a rather simple job to complete.

But if you don't, or simply do not feel comfortable completing this task, contact a mechanic who can replace your wheel bearings for you. This is a dangerous situation that you don't want to delay fixing.

Part 3 of 3: Inspecting suspension component issues

There are multiple components that comprise the modern front end suspension. Each of these parts are connected to providing steering input, power the front wheels and keep the front wheel in line so the vehicle will drive straight down the road.

Improper alignment of suspension parts can impact the stability of the vehicle, and can also cause shaking in the steering wheel. The shaking is typically caused by suspension parts that are worn out or loose, which causes the alignment issues.

In order to find out if suspension parts are worn out or the suspension alignment is faulty, you'll have to complete the following inspections:

Step 1: Check the tie rods for wear. The first items you want to inspect for wear and tear in regards to steering wheel vibration are the tie rods. Refer to your service manual for exact instructions and steps on how you should inspect them, as each vehicle's tie rod construction and location is unique.

Step 2: Check the bushings. A common cause of steering wheel vibration at lower speeds is when the bushings of the tie rods, spindles, or control arms are worn out.

First, jack up your vehicle's front end and place the front end on jack stands (make sure to put wheel chocks behind the rear wheels).

Using a flashlight, inspect the bushings for cuts, frays, pinching, signs of excess grease or the bushings being pushed out of the brackets. Try to move or wiggle the suspension part that is connected by the bushings. If the part moves, the bushings have failed and must be replaced.

Step 3: Check the shocks, struts and springs. Most vehicles have front struts or shock absorbers that are connected to the lower control arm and are a part of the suspension.

To check for wear and tear that could cause vibration in the steering wheel, complete the following inspections:


  • Look for signs of grease: When a shock or strut is leaking, you'll usually find grease along the strut or the shock mounts. This could mean that the shocks or struts are loose, causing the vibration.
  • Check the spring for damage: In some cases, the spring will become detached from the coil-over shock/strut. This can also cause vibration issues.
  • Check the shock mounts: If the mounts are loose, it will definitely cause the front end to rattle and steering wheel to vibrate. This is noticed immediately as soon as the vehicle moves forward or backward.

If you've completed all of these checks and still can't find the source of the problem, or need an extra set of professional hands to help fix the problem, contact AUTOFACTORNG to find a local ASE certified mechanic who will be happy to assist you with the steering wheel vibration issue.


Tuesday, 13 December 2016

How to Increase the Lifespan of Your Suspension

Car suspension is under constant load. Check your tire alignment, shocks and struts, and steering system to make your suspension system last longer.

No car, truck, or SUV is going to last forever, but keeping your vehicle working well for as long as possible will save you both headaches and money. Also, keeping your vehicle’s suspension in good working order will mean you’re getting the most out of your vehicle in terms of handling, ride, and most importantly, safety. With that in mind, what should you do to maximize the lifespan of your vehicle’s suspension?


The suspension is composed of hundreds of different parts, and vehicles vary tremendously in suspension designs, but every suspension has to do three things: hold the vehicle up, absorb bumps and other road shocks, and turn the vehicle in response to the driver’s input. To accomplish these tasks, the system is composed of the following major parts and subsystems:

  • Wheels and tires. Many drivers don’t think of tires as part of the suspension, but they’re arguably the most important part. Tires provide traction for acceleration, braking, and cornering, as well as absorbing smaller bumps.'


  • Springs. Every car and truck today has some sort of springs, which support the vehicle and absorb large bumps.


  • Shock absorbers. While springs absorb the bumps, shock absorbers (or, in cars that have them, struts) dampen the motion of the springs after a bump, keeping them from bouncing up and down excessively.


  • Linkages. A complete compilation of suspension linkages would fill a book, but every suspension includes various arms, rods, and other connecting pieces that collectively keep the wheels where they’re supposed to be relative to the rest of the vehicle. Most of these linkages are solid metal parts.


  • Bushings, bearings, and joints. Because most parts of the suspension have to be able to move, the various linkages are connected by flexible connections.
  • Steering system. Whether the steering is considered a separate system or part of the suspension, its operation is intimately connected to the suspension as it directs how the front wheels respond to driver commands. Every steering system includes a steering “box,” which converts rotation of the steering wheel to movement of the vehicle’s wheels, as well as linkages to connect everything; vehicles equipped with power steering also include either a hydraulic system including fluid lines and a pump, or several electrical motors.

Each of the major part types listed above requires attention, but some require much more than others. If you’re interested in making everything last as long as possible, you’ll want to do the following:
  • Check your tires’ air. This is probably the easiest maintenance to perform, and may be the most important. Properly inflated tires (check your manual for the correct pressure) help protect the rest of the suspension from damage; under-inflation costs you money in extra fuel while hurting handling and braking performance; if the tires are seriously low on air, the car won't even be safe to drive. Check inflation at least every couple thousand miles.
  • Check your tires’ tread. When you check the tires’ air pressure, check the tread too. The minimum legal tread depth is 1/16 of an inch (check it by placing a penny in one of the grooves; if you can’t cover up any of Lincoln’s head, you don’t have 1/16 depth). However, many experts recommend at least 1/8 inch for safe driving (use a nickel instead of a penny; the top of Jefferson’s head is 1/8 of an inch from the edge of the coin), and even more is best for driving in snowy conditions. Regardless, watch for uneven wear, which means there’s another problem (usually misalignment).
  • Get your wheels aligned. Proper alignment improves handling, reduces tire wear, and is necessary for safety. An alignment every two years or 30,000 miles is a minimum for most vehicles; if you drive on rough roads (including those with potholes) a lot, you’ll want an alignment about every year.
  • Check the power steering fluid and belt. If your car has hydraulic power steering, your mechanic should check the fluid level and belt tightness at every oil change or every 5,000 miles. A slipping belt or low fluid level can damage expensive power steering components, and might make your car unsafe. Also, your power steering fluid may need to be changed every 30,000 miles or so; check your owner’s manual.
  • Inspect the bushings and joints. At every oil change, your mechanic should (and probably will) check every suspension and steering system bushing and joint for wear or damage. Also, older vehicles’ tie rod ends and ball joints may need to be lubricated periodically. (Most modern cars and trucks have sealed joints.) Such checks and, if necessary, joint lubrication are a standard part of a wheel alignment and full-service oil changes.
  • Inspect the shocks. Shock absorbers and struts should be checked for leakage, as a leaking shock will soon need replacement and may contribute to damage to other suspension components. As with bushings and joints, this inspection is a normal part of wheel alignment and usually of a full-service oil change.
  • Have everything inspected if you’re in an accident. Most of the linkages and springs should last a long time, possibly the life of your car. But after an accident involving one or more wheels, every component of the suspension should be checked for damage.
One more thing: the way you drive, and where you do it, matters too. Suspensions are designed to cope with bumps, but over time they cause wear to various components; driving rapidly over speed bumps, potholes, and similar large bumps can shorten the life of the system.

Because every vehicle’s suspension is composed of so many connected parts, wear or damage to one part can sometimes damage others. The best approach to keeping your suspension working well for as long as possible is to check for wear on a regular basis, and fix any problem as soon as you find it rather than letting the damage — and the eventual cost — build up.

Thursday, 8 December 2016

Signs Your Car Needs an Oil Change

Oil changes keep your car engine running smoothly. Rough idling, slow acceleration, and engine noises mean you need to replace your car oil.


Is your vehicle feeling sluggish? Does your engine sound noisy? Is your oil pressure low and or your oil light on? Chances are, you need an oil change but even if you’re not experiencing some of the more obvious symptoms of dirty oil, your car could still be in need.


Here are the top signs your car needs an oil change:

The car makes a ticking noise when started

As your engine operates, it continuously pumps oil throughout the crankcase and cylinder heads and, after a while, that once golden fresh oil becomes dirty and contaminated from heat and wear and tear. Dirty oil tends to be sludgier and thus more difficult to move. This means there’s a good chance you may experience some valve train noise in the form of ticking at start up. This is because the dirty oil takes longer to circulate through the engine to lubricate the moving valve train.

The car idle is rough

Another side effect of dirty oil can be a rough idle that feels like the engine is shaking the vehicle more than normal. The reason for this is there’s an increase in friction between the pistons, rings, and bearings.

The car has sluggish acceleration

A well-lubricated engine is a smooth operator, so when the oil inside becomes old and dirty, it can’t lubricate the moving parts as well and as a result, it will not be able to perform as smoothly as normal. This means acceleration can be sluggish and the engine will feel down on power.

The car engine makes a knocking noise

If an engine’s knocking, it may be a result of bad oil, which if ignored for too long, can result in worn out rod bearings. A knocking noise will sound like a rock tumbler in the deep depths of the engine and it will typically shake the vehicle at idle, and get louder as engine speeds increase.

What to do when the oil service light comes on

If your oil light comes on, you won’t want to ignore this as it typically means your oil pressure has dropped far too low for the engine to operate safely. Here’s how to react when your oil light is on, but the first move is to plan for an immediate oil change.

If you'd like a mechanic to change your car oil for you, AUTOFACTORNG will come to you to keep your engine lubricated and happy.

Thursday, 10 November 2016

Do It Yourself (DIY) Tips: How To Change Your Shock Absorber

Shock absorbers are essential to a car's performance, giving it a smooth and even ride. However, these vehicle suspensions become worn out over time, causing potholes to become both more severe and difficult to ignore. If your shocks are worn out, you can replace them yourself with a little time and know-how.

PART ONE


1. Make sure you need new shocks: You might have noticed going over potholes and bumps isn't as smooth as it used to be in your ride, which is probably a sign that your shocks are worn out and need replaced. A good easy way to test your shocks and make sure they're worn out enough to be replaced is to push down hard on the trunk or the hood directly above the wheel well. Good shocks should bounce up once and settle relatively quickly. If the body bounces any more than that after pushing, it's time for a new set.

You also need to know if your vehicle uses stand-alone shocks that attach to the vehicle suspension or frame, or if it uses shock-absorber units which integrated into a suspension strut, such as the MacPherson or Chapman strut. Your car may even have a combination, using shocks in the front and struts in the back. Struts can be difficult to replace, so it's best to let a professional handle that job.

2. Purchase new shock absorbers: If you're unsure what type of shock absorbers you need, speak to someone at your local auto parts store or an auto mechanic to be sure you buy the right shock absorbers or piston for your vehicle.

3. Consider upgrading your shocks: You can get identical replacements of the shocks you have in your car currently, but taking the time to change out your shocks is also a good opportunity to perform any upgrades, if you're interested. Performance shocks are appropriate for heavy-use daily drive vehicles, es 487 pecially trucks.

Coil shocks are manufactured with a coiled spring around the body of the shock, which supports the weight of the vehicle and controls the movement of the suspension. These are adjustable, which means you can alter the height of your truck for optimum performance.

Twin-tube shocks have a set of tubes, one inner and one out, that house the piston, along with a layer of shock fluid and air, which can have a tendency to create a foamy, frothy mixture that can affect performance, though some modern variations feature a nitrogen mixture that addresses the issue. These are common on off-road vehicles.

Monotube shocks feature a tube and two pistons, which work essentially like the twin-tube shocks work, with one piston separating the layer of nitrogen from the air. It runs cool and is a popular performance choice for trucks.

Reservoir shocks are filled with fluid, and either pressurized air or nitrogen. As the shock absorbs bounce, the fluid contacts the gas, causing 14ad resistance and dampening the spring action.

4. Jack your vehicle in an appropriate location: Park your car on a level surface and loosen the lug nuts on both sides of the front or back end. Secure your vehicle with ramps and/or jack stands. Check your owner's manual for the correct jack positioning. When you've got the car up, remove the wheels and locate the shocks.

Shocks will be affixed with a vertical bolt that has to be extracted from within the engine bay or the trunk, or may be positioned at the top by a horizontal bolt that has to be unfastened and knocked out of position.

5. Check the shock mountings and spray them with metal cleaner: The most difficult part of the job is removing the old shocks, which can have a tendency to be really gunky with both age and road-grit, making the bushings and bolts somewhat difficult to remove. Check out the mountings to see if they're loose enough to get off, or if you're likely to crack the rubber around the bushing. It's ok if you do, since you're changing out the shock anyway, but it's usually easier to spray some WD-40 or PB Blaster in there and let it sit for a few minutes to try to loosen things up before you get to work.

PART TWO
Removing the Old Shocks

1. Remove bolts from the shock tower: Lots of cars have the top bolts under the fabric in the trunk of the car, which means you'll have to lift up the lining to get to the shock bolts and remove them with a ratchet and socket. As always, consult your shop manual for more specific guidelines regarding the location of the shock tower bolts. In general, though, they'll be in the trunk.
To unfasten the bolts, turn the socket and ratchet counterclockwise, greasing the b a45 olts with penetrating fluid to eliminate any surface rust, if necessary.

2. Disconnect the shock from the suspension: Use a socket set or a nut splitter to disengage the nut that connecting the shock to the suspension, and remove it from the bolt. If there isn't enough room to operate the splitter, you can apply penetrating solvent.

Depending on the assembly, you may also need to disengage the knuckle at the top of brake assembly to get the the shock. Consult your owner's manual to find out for sure. Use the same process to remove the nut that is positioned at the top and keep the nuts separate so you will know which one goes where when it is time to install your new shocks.

3. Remove the shock absorber from the bottom and top bolts: Wiggling the shock off the bolts can be surprisingly difficult, especially if the shocks are mounted on studs with a retaining bracket and everything's rusty. Wiggle it around a while and it should come off eventually.

One common frustration occurs when your piston rod keeps turning with you as you're trying to loosen the nut. You can use locking pliers on the end of the rod and keep it from turning with the pliers while loosening the nut with a wrench, but that can be just as frustrating. There's a hollow hex kit that fits over the rod and a tailored wrench made for the purpose, available at any auto parts store for about eleven bucks.

If you need to bang on the bolt with a hammer or the end of your wrench to get it loose, that's ok, but make sure you put one the nuts back on to use as a hitting surface. Don't risk misaligning the bolt and messing up your ability to reinstall the shock properly. Let the metal cleaner do its work and take your time. It'll give.

Installing New Shocks

1. Fit the new shock back onto the suspension control arm: You might need to use some pressure to constrict the shock as it falls into place, and you might need a help to help lift the suspension back up to reinstall the bolts in the correct positions. It can be kind of a balancing act, so it helps to have another set of hands. Screw on the nuts hand tight.

2. If needed, you may once again affix the anti-roll bar if you removed it earlier: Reattach it and screw the bolts back on hand-tight. Replace the shock tower nuts you removed at the beginning of the process, probably in the trunk of the vehicle.

3. Check your torque specs in the service manual: Before you go tightening everything back down, recheck the specifications for torque to be sure everything's secure.

4. Repeat the steps to replace the other 3 shock absorbers, if necessary: Most of the shocks should wear out at the same time, so if you're going to do one, you're probably going to end up doing them all. Do in following the same steps and then put the wheels back on and tighten the lug nuts to finish the job.

Thursday, 3 November 2016

Do It Yourself (DIY) Tips: How To Change Your Air Filter

Any part of the car that takes in fluids or air from the environment should have a way of separating the good from the bad, of taking in only what benefits the mechanism and leaving the rest behind. This is why cars have air filters and fuel filters. True, they require regular looking after but this is one of the simplest and least expensive — and most important — maintenance procedures you can perform for your car. Changing your car's filters on a regular basis can have a significant impact on engine life and performance.


We'd like to walk you through a basic filter change. It doesn't take long, saves you money, and sends your car down the road refreshed and renewed. A clogged air or fuel filter can cause poor performance, poor fuel mileage and reduced engine life. This simple procedure guards against that.

How often should you do this? Check your owner's manual for the manufacturer's recommended intervals. If the manual's not available, a good rule of thumb is: air filter replacement every 12 months or 12,000 miles (whichever comes first); fuel filter replacement every 2 years or 24,000 miles (whichever comes first).

Changing the Air Filter

If nothing else, learn how to change your own air filter. It's quick and easy and saves you money.

Steps for changing the air filter
1. Pop the hood and gather your tools
2. Locate the air filter
3. Open the air filter casing
4. Pull out the air filter
5. Inspect the air filter
6. Install the new air filter

Pop the hood and gather your tools
First, park your car in the shade and pop the hood. Prop it up so it doesn't bang you in the head, then let the engine cool for a few minutes.

While it's cooling, go get your tools. You'll need very few for this procedure — grab a butter knife, two medium-sized screwdrivers, one standard and one Phillips, and head back to the car.

Locate the air filter
The air filter is typically enclosed in a black plastic casing near the center-top of the engine (sometimes, however, it will be off to the side). It should be the largest non-metal assembly you see, about the size of a breadbox. Find it? Good. Now, open it.

Open the air filter casing
How? Well, most of them are held together by a couple of large metal clips on the side. Slide the butter knife or flat-headed screwdriver between the casing and the clip and then pry the clip away. Continue around the case's perimeter, loosening all the retaining clips which should allow you to open the case up. Occasionally you'll find an air filter housing that's held together with several long screws, in which case you'll have to unscrew them to get at the filter.

Should you own an older car (especially an American one) or truck, it might have a circular air filter (that's shaped like a big donut) located under a likewise circular metal housing sitting right on top of the engine. These are usually accessed via a simple, single wing nut atop the cleaner.

Anyway, crack it open and you'll find the air filter inside. It's usually white, bright yellow, orange or red, the better to see the collected dirt.

Pull out the air filter
Pull out the filter — it's typically flat and/or elongated, and is made of a paper element with rubber edges to seal it against the casing.

Inspect the air filter
Next, check it for cleanliness. Hold it up to the sunlight and (while keeping it at arm's length from your face) bend it back, so the paper ridges of the filter flutter like the pages of a book, and look inside the crevices. Do you see a lot of accumulated dirt and grime? Now look at it straight on. Is the orange or yellow paper mostly dirty in the center? If so, then you should replace it.

Install the new air filter
Close up the casing and put the old air filter in a plastic bag. You're going to want to bring it with you to the AutoFactorNG to compare old with new and make sure you get the right replacement. Toss it in the car and go clean up. By the way, it's okay to drive a car short distances without an air filter (something you can't do with a missing fuel filter).

Here's what you need to buy at the AutoFactorNG:


  • New air filter
  • New fuel filter
  • New gasket(s) for the fuel filter — they normally come with them, but ask to be sure

When you get back home install the new air filter. Seal it up and you're done.

Fuel Filter Replacement

Steps for changing the fuel filter
1. Find the air filter
2. Extinguish any smoking materials
3. Remove any plastic coverings
4. Locate the fuel line
5. Plug the fuel line
6. Remove the old fuel filter
7. Install the new fuel filter
8. Check if you need to replace the hoses
9. Run the engine and confirm that no fuel is leaking

Find the air filter
This is a little tougher than replacing an air filter, since finding the thing can be half the battle. It's typically located near the top-center of the engine, close to the air filter, although sometimes, with more modern cars, it's actually built into the fuel tank and is a job best suited to your mechanic.

Extinguish any smoking materials
First, if you value your life, extinguish any smoking materials while doing this procedure.

Remove any plastic coverings
Second, for better access, remove any oversized, plastic coverings from the top of the engine. They usually come off with a large, flat-head screwdriver.

Locate the fuel line
Now search for the fuel line, which comes from the rear of the car. It's about the same diameter as a finger, and will be soft and pliant at this location, not a hard metal shaft. It will come into the fuel filter from the rear of the vehicle.

Plug the fuel line
Find it? Okay, now grab a couple of # 2 pencils. You'll also need several different sized screwdrivers, both flat-head and Phillips, and a small ratchet set.

The fuel line will normally be secured to the fuel filter with a little clamp. Work it off with a screwdriver — usually a Phillips — and then jam the pointed end of a pencil into the free end to keep gasoline from spilling out. You may need a larger diameter object than a pencil, so you'll have to be resourceful here, since we don't know what you have lying around in your junk drawer at home.

Remove the old fuel filter
After you've plugged the fuel line, you can remove the fuel filter. It's normally secured with a couple small bolts. Find the right-sized socket and remove the filter. It will also have a hose coming off the other end (this goes to the engine), so remove this one the same way you did the other one, and plug it with another pencil.

Compare the new filter with the old filter, and make sure you position it in the same way, so that the fuel is flowing in the right way. Sometimes there's an arrow on the filter showing you which direction the fuel flows.

Install the new fuel filter
Put the assembly together in the reverse order that you used to take it apart. Before you do, though, take a quick look at the new filter.

You'll note that there two metal (or plastic) shafts coming off the filter where the hoses attach. They have little nubs or ridges near the ends. Make sure to slide the rubberized lines onto the filter as far past the nubs as you can get them.

Also, pay special attention to the clamps on either end of the filter. Position them between the nubs and the body of the filter. Then get them snugged down good and tight (but not so tight as to strip the screw), to prevent leakage.

Check if you need to replace the hoses
One last thing. If the hoses are getting brittle and frayed, make a mental note to buy some new hoses next time you change your filter. If they're really bad, replace them now.

Run the engine and confirm that no fuel is leaking
After you have everything reassembled and secure, run the engine for a few minutes. Inspect the hoses and connections to make sure no fuel is leaking.

That's it!

Remember, next to changing your oil and oil filter, replacing your air and fuel filters on a regular basis is the single most important act of maintenance you can perform for your engine. Do it and your engine will thank you by giving you many thousands of trouble-free miles.

Tuesday, 1 November 2016

Symptoms of a Bad or Failing Mass Airflow (MAF) Sensor

Common signs include running rich at idle or lean under load, decrease in fuel efficiency, and rough idles.


Mass Airflow Sensors (MAF) have the responsibility of reporting the amount of air entering the engine to the Powertrain Control Module (PCM). The PCM also uses this input to calculate the amount of engine load.

There are several designs of MAF sensors, but the most common, by far, is the hot wire MAF sensor. The hot wire MAF has two sensing wires. One wire is heated and the other is not. The microprocessor (computer) inside the MAF determines the amount of air entering the engine by how much current is required to keep the hot wire about 200 ℉ hotter than the cold wire. Whenever the temperature difference between the two sensing wires changes, the MAF will either increase or decrease the current to the heated wire. This equates to more air into the engine or less air into the engine.

There are a number of driveability issues that arise from faulty MAF sensors.

1. Runs rich at idle or lean under load

These symptoms indicate a MAF that has a contaminated hot wire. The contamination comes in the form of spider webs, potting compound from the MAF sensor itself, dirt that gets attached to oil on the MAF from an over-oiled aftermarket air filter, and more. Anything that acts like insulation to the hot wire will cause this type of issue. The fix is as simple as cleaning the MAF sensor with an approved cleaner, which the technicians at AutoFactorNG can do for you if they determine that this is your root problem.

2. Constantly runs rich or lean

A MAF sensor that continuously over-reports or under-reports airflow into the engine will cause an engine to run rich or lean. If the engine control system is working correctly, you will probably never notice this except for a change in fuel economy. A trained technician will have to look at fuel trim status with the use of a scan tool to verify this. A MAF sensor that behaves like this will require replacement. Before replacing the sensor, however, the rest of the circuit should be checked for proper operation. If the circuit (wire) has an issue, replacing the sensor will not solve your problem.

3. Rough idle or stalls

A completely failed MAF sensor will not send any airflow information to the PCM. This prevents the PCM from accurately controlling fuel, which will result in an engine that either will idle roughly or not at all. Obviously, replacing the MAF sensor is needed in this cases.

Thursday, 27 October 2016

Do It Yourself (DIY) Tips: How To Change Your Brake Pads

Are you hearing a nasty screech when you press the brake pedal in your car? Does it sound like rock monsters are playing the world's loudest frame of bowling every time you need to slow down? Well, it may be time to change your brakes.


You will be pleasantly surprised to find that you can change your car's disc brake pads quickly, easily and without specialized tools. Doing it yourself also will save you a lot of money. But even if you're not interesting in doing this yourself, knowing what's involved makes it easier to understand what your mechanic may someday tell you.

Nearly all cars these days have front disc brakes. Front brakes usually wear out more quickly than the rear brakes (which could either be disc or drum brakes), so they need to be changed more often. You need to change brake pads when they get too thin, especially if they begin to make a persistent metallic squeaking or grinding noise when you press the brake pedal. But noise alone isn't always the best indicator, so it's best to anticipate when this will happen by periodically inspecting the thickness of the brake pads.

Note: If the front end of the car vibrates when you apply the brakes, your brake rotors may be warped. If the rotors appear grooved or uneven, they may be scored. In either case the rotors may also need to be replaced or "turned" on a brake lathe, a procedure not covered here. You may need a professional's help for this, but you can see what's involved in a rotor change by looking here.

Time Required: 1 hour

Tools Required

- Disposable mechanic's gloves to protect your hands and keep them clean
- Jack and jack stands
- Lug wrench
- C-clamp or length of wood to retract the piston
- Wrench (choose a socket, open end or adjustable wrench)
- Turkey baster for drawing out brake fluid
- Plastic tie, bungee cord or piece of string

Materials Required

- New brake pads — Since you are saving money by doing this yourself, you might want to consider splurging a bit by buying original manufacturer brake pads, which are more expensive.
- Can of brake fluid — check your owner's manual for the proper type.

A couple of things to note before you begin
Brake Pad

Know your calipers: The majority of cars have a "sliding caliper" brake assembly. That's what's shown in the photo above. Compare this brake assembly to the one in your car. Other cars have "fixed caliper" assemblies. The pads in fixed-caliper brakes are also easy to change but the process is slightly different, so we'll cover it in another instructional piece.

Do one side, then the other: For reasons that will be clear later, you should change the pads on one side of the car from start to finish before doing the other side. Also, since you're doing one side at a time, turn the steering wheel so that the wheel you're working on is angled out for better access to the brakes.

Now we can get started.

Steps for changing your brake pads

1. Remove the wheel
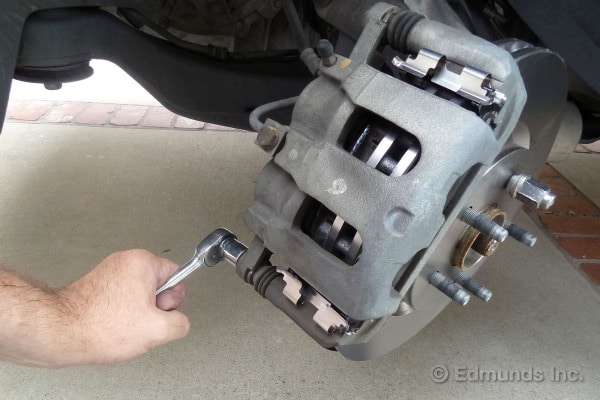
2. Remove the slider bolt
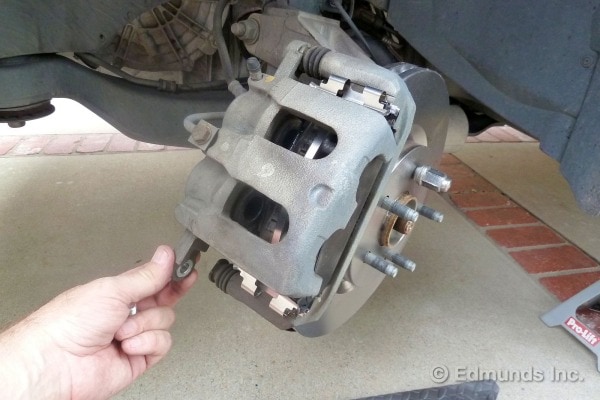
3. Pivot the caliper up
4. Slide out the old brake pads
5. Replace the retaining clips
6. Slide in the new brake pads
7. Retract the pistons
8. Monitor the brake fluid level
9. Reposition the caliper
10. Reinstall the slider bolt
11. Repeat for the other side
12. Test-drive under safe conditions

Remove the wheel
Brake Pad
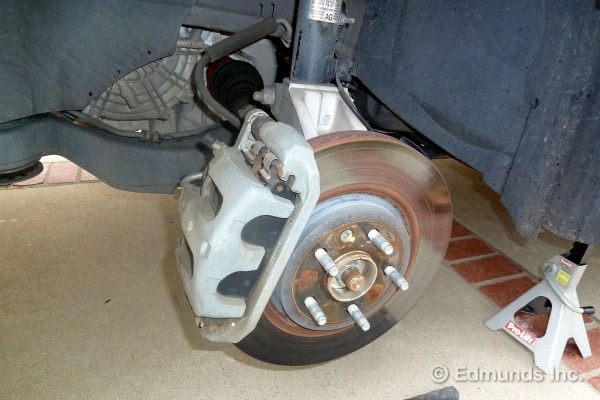
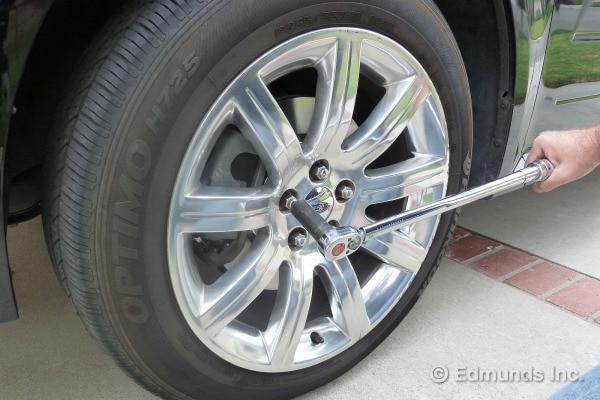
Loosen the lug nuts on the wheel. Then jack up the car and place a jack stand under the car's frame. Lower the jack so its weight rests on the jack stand. Fully remove the lug nuts and remove the wheel. You now have access to the brake assembly and can safely reach under the car.

Remove the slider bolt
Brake Pad

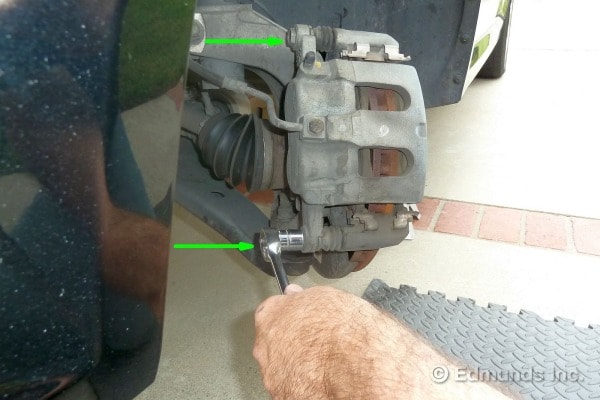
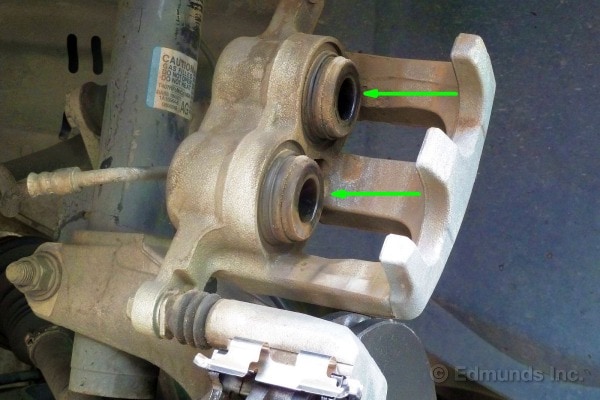
Find the two slider bolts (sometimes called "pins") that hold the caliper in place. On this car, a 2009 Ford Flex, the bolts are on the inside. The arrows in the photograph above point them out. It's generally only necessary to remove the lower bolt. It can be long but once it is fully loosened, it will slide out easily.

Pivot the caliper up
Brake Pad

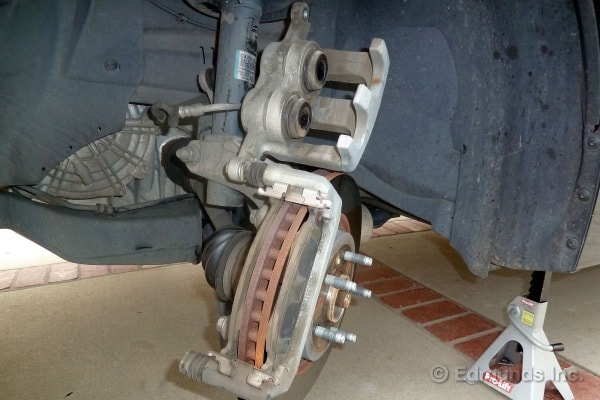
With the bottom bolt removed, the caliper pivots up, as shown in the photograph above. The rubber hose, which is the hydraulic line, will flex to allow this so do not disconnect any hydraulic lines. If you think you have to disconnect a hydraulic line, you're doing something wrong. Reassemble the brakes and seek professional help.

At this point, it is very easy to inspect the thickness of the brake pads to confirm that they need to be changed. Most brake pads have metal wear indicators, which are small metal tabs that squeak when they contact the rotors. Even if these are not yet touching, the pads are worn out if the friction material is 1/8th of an inch thick or less at any point.

Slide out the old brake pads
Brake Pad
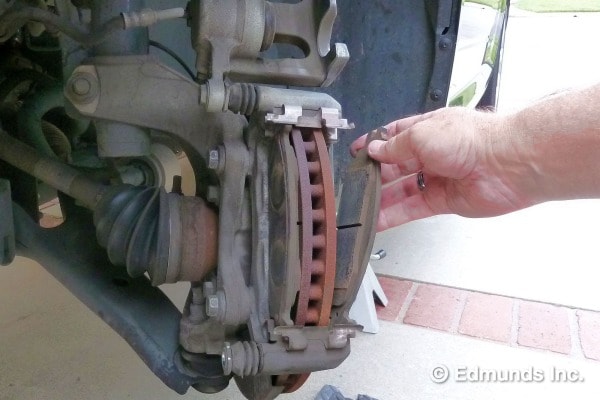
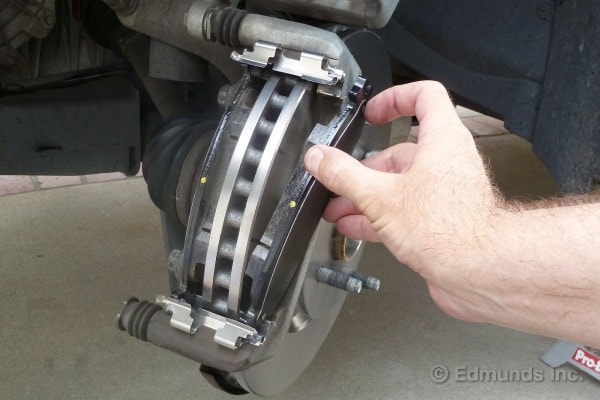
The brake pads are now exposed and the retaining clips hold them loosely in place. Simply slide the old brake pads out, as shown in the photo.

Brake Pad

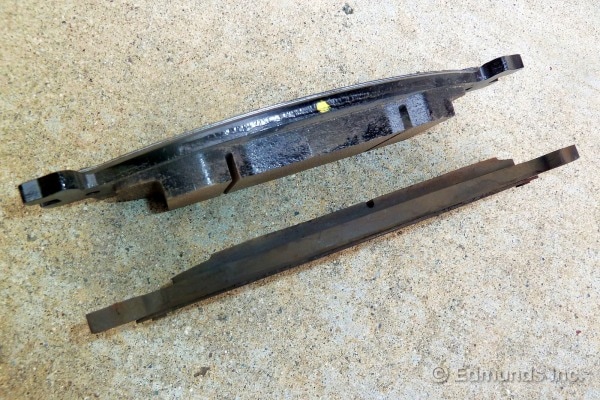
In the above photo, you can see a comparison of the new, thicker brake pad (top), next to the old, worn-down brake pad (bottom).

Replace the retaining clips
Brake Pad

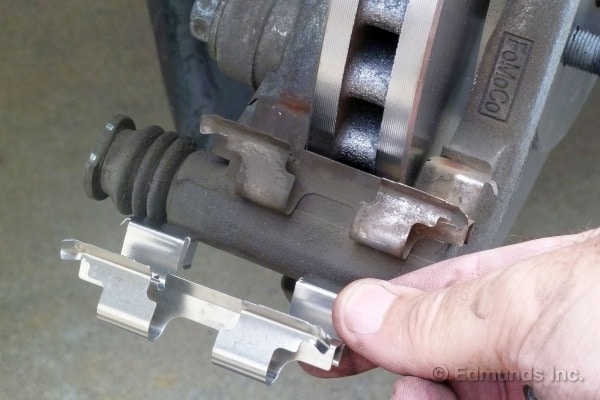
The photo above shows the pad's new retaining clips. New pads almost always come with new clips, which allow the pads to slide back and forth easily. Use the new ones and chuck the old ones. There are no retaining screws for the clips. They just snap in place. There are usually left-handed and right-handed clips, so change one at a time, making sure they match up exactly as you go.

Brake Pad
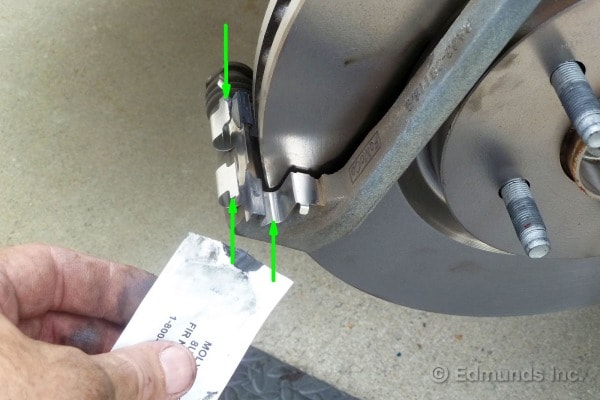
Often, a small packet of graphite-based grease will come with the brake pads. Apply this to the clips of the new brake pads to keep them from squeaking, as shown in the photo above.

Brake Pad
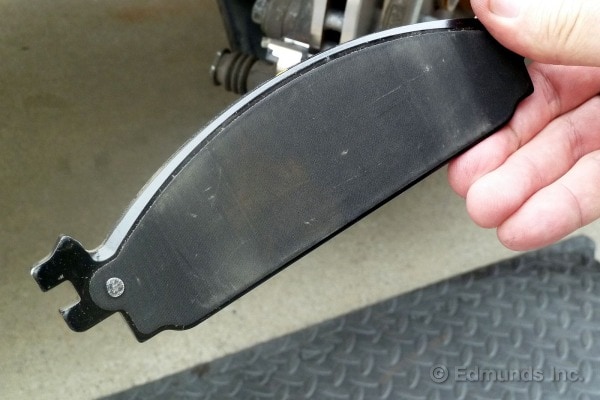
This photo shows that the new brake pad has a riveted-on shim, which is the thin metal plate. Some brake pads might have unattached shims that have to be temporarily held in position until you lock the pads in place. The "ears" are the metal tabs on either end of the brake pad (only the two left ears are visible here). These ears fit into the slots in the clips. Some of the grease can be applied to the ears and between any loose metal shims, too.

Slide in the new brake pads

Brake Pad
The new pads slide into place as easily as the old ones did when they came out, though sometimes the new clips will be tighter. The ears of the new pads should slot nicely into place on the grease you applied.

Retract the pistons
Brake Pad

In the photo above, the arrows point to the pistons. These pistons press on the brake pads and squeeze the rotor to stop the car. Your car might only have one piston for each wheel, but the principle is the same. Before you can lower the caliper into place, these pistons need to be retracted (pushed back) so that they will clear the new, thicker brake pads.
Brake Pad
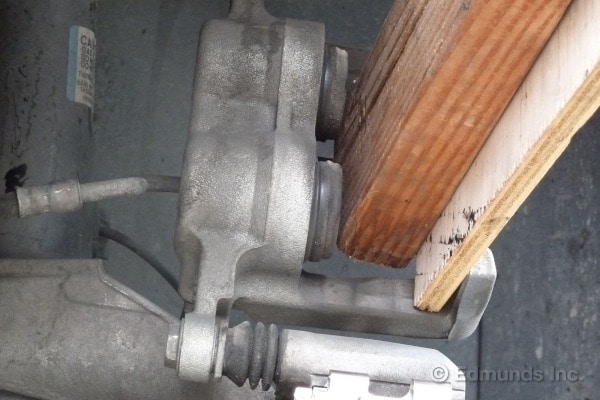
Do-it-yourselfers often use a C-clamp to retract the piston or pistons. In this case, we simply levered the piston back using a 2x4 and a piece of plywood. By doing this, the brake fluid in the pistons is being pushed back into the master cylinder reservoir through tiny passages, so the pistons move slowly. The width of the 2x4 allows both pistons to be pushed in at once. If you pushed in one by itself, the other would pop out — you don't want that. Fortunately, most cars have just one piston per caliper, which makes things far simpler. Either way, steady pressure and patience are key here. In this example, we added a second plywood shim near the end of the process to fill the ever-increasing gap. Throughout, take the utmost care to ensure you don't nick or tear the rubber boot and seal that encircles the pistons.

Monitor the brake fluid level
Brake Pad
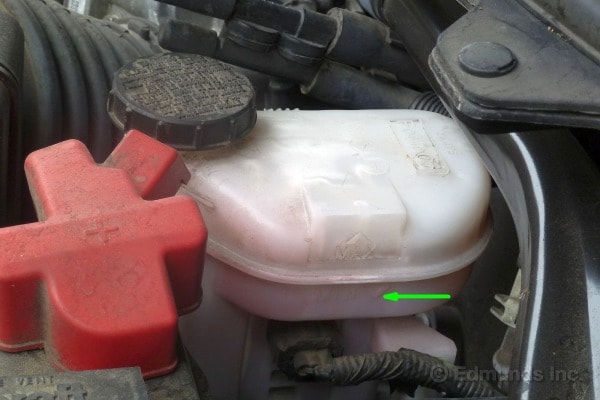
When you push the pistons back, the brake fluid level slowly rises. Open the master cylinder reservoir and check it often. This is more of a concern when you work on the second brake, because the combined fluid volume of two calipers could cause the brake fluid to overflow. If it looks like this is going to happen, suck out some of the brake fluid with a turkey baster. There is more danger of overflowing if someone topped off the fluid level during regular service visits. (This is why the brake fluid reservoir shouldn't necessarily be topped off like that.) The fluid level naturally goes down as the pads wear. And it comes back up when the pads are replaced. As long as the level doesn't go below "MIN," the arrow shown in the photo above, on the lower half of the reservoir, everything is cool.

Reposition the caliper
Brake Pad


With the pistons retracted, the caliper should slip over the pads with little effort. Sometimes the fit is tight and the caliper will slide on the newly installed brake pads. If the pistons catch on the brake pads, you might need to check that you retracted the piston completely.

Reinstall the slider bolt
Brake Pad
Reinstall and retighten the slider bolt. Straighten the car's wheels, re-mount the tire and tighten the lug nuts.


Repeat for the other side

Repeat all these steps for the other side of the front brakes. Remember that the brake fluid will be higher in the reservoir now that new pads are installed on one side, so keep your eye on the fluid level as you retract the piston on the other side. The fluid will only rise further the second time around. You don't want it to overflow since the brake fluid is highly corrosive. If it looks as if the fluid will overflow, suck some out with the turkey baster. If the level is below the "MAX" when both sides are done, add fresh fluid to top things off to the line.

Test-drive under safe conditions

Test-drive the car under safe conditions to make sure everything is working properly, being especially careful for the first few stops. Be aware that your brake pedal might have a higher engagement point. You will quickly get used to this change. Enjoy using your new brakes knowing there are now thick brake pads to stop you safely.

Thursday, 20 October 2016

Do It Yourself (DIY) Tips: How To Service You Car

Much money can be saved when you go the Do It Yourself (DIY) route in servicing your car. The added benefit is that you get to use top quality components and have done a thorough job.

It really is quite simple to perform a basic full service and does not require any more than the ability to tighten or loosen a nut or screw!

Regular servicing of your car is important to keep the mechanics of your vehicle in good working order, to prolong it’s life and to keep it safe.


 It’s rather common place to miss out a service here and there simply to cut down on expenses. Servicing your car can be a costly affair, especially if you cover high mileage every year, so why not try it yourself?
By servicing your own car, you’re likely to save at least 2⁄3 of the price a garage would charge you. A basic car service is a relatively easy procedure. This guide explains how to service a car.

CAR MAINTENANCE
Consult your cars manufacturers handbook if you have one as this should provide details on when to service your car. If the manufacturers guide is not available, generally a car should be serviced anywhere from 6,000 to 10,000 miles or once a year if under that mileage. Regular home car maintenance should include:
  • Checking oil levels
  • Engine coolant levels
  • Hydraulic brake fluid levels
  • Windscreen washer refilling
  • Tyre pressures and tyre damage such as cuts and bulges. The tyre tread depth should be at least 1.6mm around the entire circumference of the centre 3⁄4 breadth of the tyre. Also check for safety markers. 
  • Indicators, brake, rear and head lights

CAR SERVICE CHECKLIST
In order to service your car, a car service checklist will need to be compiled. A servicing checklist can often be found in your cars service manual or documents. If this information isn’t available use the car service tool checklist below:
  • Oil filter wrench/removal tool
  • Spark plug removal tool
  • Socket set or spanner for removing the sump plug for oil drainage
  • Screwdriver for unscrewing air filter case if applicable. Clips may be the case alternatively
  • Car jack and axle stands
  • Radiator Coolant tester
  • Oil catch pan

Axle stands
CAR AXLE STANDS
Axle stands are cheap to purchase from hardware stores such as AutoFactorNG

CAR SERVICE PARTS CHECKLIST:

  • Engine oil – consult your cars manufactures guide for the correct oil type
  • Oil filter – use a quality branded filter
  • Sump plug washer – use a new sump plug washer and not the old one
  • Spark plugs – again good quality branded plugs
  • Air filter
  • Radiator Coolant if applicable


An oil filter wrench / removal tool
OIL FILTER WRENCH / REMOVAL TOOL
An oil filter wrench / removal tool can be purchased inexpensively in many vehicle hardware stores or easily from the internet. Wrenches are designed to fit all car filters.


ENGINE OIL CHANGE
Let’s start with the engine oil change. The engine oil needs to be warm before draining as warm oil will flow more freely than cold. Run the engine for 15 minutes or so before drainage. Ensure you perform the oil change on a level surface.

Jack the car up and axle stands for safety. Remove the oil cap on the top side of the engine. Failure to do this may cause a vacuum when draining the oil, resulting in not all the oil being removed. Place the oil catch pan under the sump plug and drain. The engine oil may be hot so be careful.

OIL FILTER
Turn the oil filter wrench anti-clock wise to remove the filter. The filter may still have plenty of oil inside so be careful not to spill oil. Ensure the filter seat on the engine is clean and place a light coating of oil on the gasket of the new filter. Initially screw the oil filter back on and gently tighten with the oil filter wrench. Ensure not to over-tighten for risk of damaging screw thread.

ENGINE OIL CHANGE CONTINUED
The oil can take several minutes to fully drain. When the engine is fully drained, replace the sump plug using a new washer and refill the engine with oil. It is important to refill the engine with oil slowly making regular checks of the engine oil level indicator on the cars dipstick. The last thing you want to do is have to drain the oil again by over filling the engine. Once the oil level is a little below the maximum marker on the dipstick, replace the oil cap start and run your engine for around 10 minutes. Turn off the engine and check once again the oil level using the dipstick. Finally make a check for any leakages on the sump plug.

HOW TO DISPOSE OF ENGINE OIL
Disposing of engine oil onto the ground is highly toxic and can enter the water table. It is also illegal to dispose of oil in the garbage and down storm drains. Used engine oil needs to be disposed of responsibly by locating your nearest waste oil recycling bank.

ENGINE COOLANT / RADIATOR COOLANT
An integral part of an engine is the cooling system. Around one third of the energy produced by car engines is wasted due to it being converted to heat. The correct mixture of engine coolant is essential to not only keeping an engine from freezing in the winter, but from overheating in the summer, and to prevent the corrosion of internal components. See what is engine coolant for a guide on exactly what coolant does, the various types, what type of coolant you should use when servicing your car and how to check engine coolant levels.

CHANGE SPARK PLUGS
Before removing the old spark plugs, ensure there is no debris around the chamber that may fall into the ignition chamber. Using a good quality brand with a copper core electrodes, insert the plugs until hand-tight. Continue to tighten the plugs with the spark plug removal tool for a further 1⁄4 to 1⁄2 turn of the tool ensuring that you don’t over-tighten as this may result in thread damage.

AIR FILTER
Fitting a new air filter is a simple process. The air filter housing may be secured by screws or simply clipped on. The new air filter simply needs to be dropped in.

RADIATOR COOLANT
Ensure the engine has cooled sufficiently before opening the cap on the coolant reservoir. Coolant tanks can be under pressure with boiling hot water contained. The colour of the liquid should be blue, green or pink depending on the Radiator coolant's colour. Any other discolouration or oil in the coolant tank should be investigated by a specialist. A Radiator coolant tester is cheap and easy to use. It will contain instructions on how to use and to maintain the correct level.

ADDITIONAL MAINTENANCE CHECKS
When changing the spark plugs, check the leads for any sign of deterioration. A good set of leads should last for well over 10 years. Timing and cam belts should be checked for signs of wear and tear. These belts don’t usually need changing with each service although renewing them regularly will decrease the risk of engine damage.

WHAT OIL FOR MY CAR
There are 3 main types of engine oil that can be used in your car.
  1. Fully synthetic engine oil
  2. Semi synthetic engine oil

Fully synthetic engine oil is essentially artificially made. It’s purpose is to last longer than conventional oil before the components break down. This means that the oil life span will last longer between engine oil changes. Another advantage is that fully synthetic oils withstand higher and lower temperatures better than convention engine oils by retaining it’s original structure in extremes, therefore reducing engine wear. The disadvantage with fully synthetic engine oil is it is significantly more expensive than semi synthetic and traditional engine oils.

Semi synthetic engine oil is a combination of fully synthetic and traditional engine oil. Semi synthetic offer many of the advantages of fully synthetic but at a lower cost.

WHICH ENGINE OIL SHOULD I USE
As a general guide, a typical modern family car will run just fine on semi synthetic engine oil. High performance engines are better suited to fully synthetic engine oils.

CAR SERVICE COST
The cost of servicing your car can vary significantly. A basic car service will be significantly cheaper than a full service

BASIC CAR SERVICE
A basic car service may include but not limited to:

Engine oil change
Air filter
Oil filter
Spark plug change

The above is a very basic service. Many garages are likely to include more in their basic service.

FULL CAR SERVICE
A full car service may include but not limited to: