Showing posts with label brake pad. car brake. Show all posts

Wednesday, 22 March 2017

How Do I Know If I Need New Brake Pads?

Car brakes squeak when the pads are worn and need to be replaced. Replace your car brake pads every 35,000 miles to maintain safe braking performance.


Signs that you need new brake pads
Usually, you will be able to tell when your brake pads are worn due to the changes it brings about in your vehicle. Here are some of the signs that you may notice when it is time to get the your brake pads replaced:

  1.  A grinding or screeching noise when trying to come to a stop
  2. The brake pedal is lower than usual
  3. There is a vibration when trying to bring to stop the car
  4.  Lots of brake dust on the wheels of the car

Being able to bring a car to a complete stop in a hurry is important and an essential part of staying safe while on the road. Most drivers brake multiple times a day, but fail to realize just what it takes to perform this vital task. The brake pads are vital in bringing the car to a stop. Depending on the type of car that you have, there may be brake pads on all four wheels. The brakes pads are made of metal and carbon fiber, which makes them extremely durable and resilient. The only time these pads are used is when you press down on your brake pedal.

The brake pads are housed in the calipers and when the brake pedal is pushed the calipers put pressure on the pads, which then press up against the brake rotors. As time goes by, the wear and tear that come from the friction with the rotors will require the pads to be changed out. Usually, a set of brakes will last around 30,000 to 35,000 miles. Driving around too long on with worn out brake pads can lead to a variety of other damages and in instability in your braking system. When the time comes to get the pads replaced, you will need to make sure that you pick a quality pair.

Taking the time to notice what your car is telling you regarding your braking system can save you a lot of frustration in the long run.


Getting the right brake pads to put on a car can be made a lot easier by getting some professional guidance. The more you can find out about the brake pad options on the market, the easier it will be to choose the right ones. A mechanic can install the brake pads easily once you decide which ones are perfect for your car.

Thursday, 1 December 2016

16% Discount off Items this December

As the year 2016 is winding down, we are giving out 16% Discounts off all Suspension parts (shock absorbers, stabilizer linkage, ball joint, tie rod etc), Brake Systems (Brake pad, brake disc, brake calipers, brake shoes etc), tyres and batteries.


This promotion is open to both new and existing customers. Santa came in early because we are a company that cares for all our customers and want 100% satisfaction for everyone. We know that many will need their vehicles in perfect condition for the holiday travel and outings.

We also offer car diagnosis services which will be performed by our well trained and experienced technicians.

AUTOFACTORNG 216  is committed to bridging the gap between our customers and quality assured auto- products and auto-repair services, with quality and customer satisfaction being our watchword. And as we continue to expand nationwide, our SCALE of services will upgrade in class, satisfactory and convenience.

Tuesday, 29 November 2016

Top 10 Bad Car Symptoms You Should Never Ignore

Cars are intricate machines with thousands of individual parts. Over time and use these parts can wear down, become damaged, and cause problems. Repairing them can be costly, but it actually makes better financial sense to get bad or failing parts fixed right away. That way, you’ll avoid bigger problems further down the road. These 10 bad car symptoms should never be ignored.


Tire bulges: If you hit a piece of debris or overinflate your tires, a tire bulge can form. Tire bulges are bubbles of air in the sidewall where air has forced its way through the inner lining. They’re a visible weak point that can burst unexpectedly. To avoid a dangerous situation, get bulging tires replaced immediately.

Jerky shifting: Rough shifting is a sign there’s a problem with your car’s transmission. Worn clutches, stripped gears, and low transmission fluid can all result in jerky or clunky shifting. Whatever the cause, the problem will get worse each time your car changes gears, potentially leading to total transmission failure. A new transmission can cost thousands of dollars, so it’s always cheaper to get the problem inspected.

Squeaky belts: Drive, serpentine, or timing belts help keep your engine running in time and power electrical systems. If you hear a squeaking or chirping noise from under the hood, it’s a sign that a belt is worn down. Sometimes a fix is as simple as making an adjustment, but some cars have belts which can’t be adjusted. Either way, get it fixed ASAP – worn belts can snap and damage your engine beyond repair.

Stinky exhaust: Car exhaust always has some smell, but if it smells stronger or worse than usual, it means something is wrong. Leaking fluids can burn up on hot surfaces, producing unusual odors. Catalytic converters are designed to filter the exhaust, so a strong exhaust smell could mean this part is failing. The air/fuel mixture could also be off, which wastes fuel and makes the exhaust smelly. Follow your nose and inspect your car to find the source of the smell.

Scratched paint: A little scratch in your car’s paint could be a bigger deal than you think. Besides making it look good, your car’s paint protects the body panels from outside elements. Paint scratches expose the sheetmetal to moisture, creating an area where rust can form. Prevent corrosion by touching up the scratch with factory paint, or a dab of clear nail polish.

Wobbly steering wheel: Different problems can all lead to the same feeling of shakiness when you hold the steering wheel. Failing or improperly aligned suspension could be a cause. An out of balance wheel and tire, which also results in premature tire wear, could be the culprit. If a wheel bearing is worn it could cause shaking, and in a worst case scenario could fail and let the wheel detach from the car. Regardless of the cause, a wobbly steering wheel limits the amount of control you have over your car.

Squealing brakes: Generally, squealing or squeaking brakes indicate that it’s time for a new set of brake pads. Brake pads have a metal tab that becomes exposed as pad material wears away. When this tab contacts the brake rotor, it makes a high-pitched sound. It’s an audible signal that the pads need to be replaced, and the longer you wait, the worse the sound (and your braking ability) is going to become.

Burnt-out bulb:  A dead headlight or taillight bulb isn’t going to change the way your car drives, but it is a great way to attract the attention of law enforcement. Getting the bulb replaced quickly is going to be the simplest way to avoid an expensive ticket.

Smoke: It’s dangerous to keep driving if you see or smell smoke in your car. Many things could cause your car to smoke, but common culprits are leaking fluids, electrical issues, or a seized brake caliper. Don’t drive until you’ve located and fixed the problem that’s causing the smoke – otherwise you risk a vehicular bonfire.

Check Engine Light: The Check Engine Light on your dashboard can be a real mystery. It tells you something is wrong, but never tells you what that something is. Is it electrical or mechanical? Major or minor? You’ll never know unless you scan for error codes, so it’s best to get a diagnosis right away to prevent further problems.

Thursday, 17 November 2016

Symptoms of Bad or Failing Brake Pads

Brakes are the component in the braking system that provide the friction to slow your vehicle. They are located in the brake calipers and function by pressing against the disc brake rotors with friction material to slow and stop the wheels.


As they are a contact wear item, the brake pads will eventually wear out over time and need to replaced. Usually bad or failing brake pads will produce a few symptoms that will alert the driver that the vehicle may require service.

1. Noisy brakes

The most common symptom of bad or failing brake pads are noisy brakes. Brake pads can accumulate dust as they wear, which if allowed to build excessively, may cause vibration and squealing when the pedal is applied or let off. Squealing brake pads can also be caused by excessively worn pads that have worn down to the point where the wear sensor has come into contact with the rotor. Severely worn brake pads, ones that have worn all the way to the brake pad backing plate, will produce a scraping sound as a result of the metal-on-metal contact between the brake pad backing plate and the rotor. Depending on the extent of the wear, the scraping may be audible when the vehicle is moving forward or when the pedal is depressed.

2. Pulsating pedal

Another symptom of bad or failing brake pads is a pulsating brake pedal. Severely or abnormally worn pads can cause the pedal to pulsate when the brakes are applied. A pulsating pedal may also be indicative of a potential problem with the rotor as well, as the pulsation felt in the pedal is a result of the contact between the rotor and brake pad.

3. Poor brake response

Bad or failing brake pads can also cause poor brake response. If the brake pads have been excessively overheated or severely worn, their capacity to slow the vehicle may be hindered as a result. Reduced brake response will take away from the overall handling and safety characteristics of the vehicle, especially during heavy braking situations where the force and heat generated by braking is considerably higher.

Because the brake pads are essentially the direct component that actually slows the vehicle, they are very important to the overall safety of the vehicle. If you suspect that your brake pads may be worn, or are making noise, have the vehicle’s brake system inspected by a professional technician, such as one from AutoFactorNG. If necessary, they will be able to replace the brake pads for you.

Thursday, 10 November 2016

Do It Yourself (DIY) Tips: How To Change Your Shock Absorber

Shock absorbers are essential to a car's performance, giving it a smooth and even ride. However, these vehicle suspensions become worn out over time, causing potholes to become both more severe and difficult to ignore. If your shocks are worn out, you can replace them yourself with a little time and know-how.

PART ONE


1. Make sure you need new shocks: You might have noticed going over potholes and bumps isn't as smooth as it used to be in your ride, which is probably a sign that your shocks are worn out and need replaced. A good easy way to test your shocks and make sure they're worn out enough to be replaced is to push down hard on the trunk or the hood directly above the wheel well. Good shocks should bounce up once and settle relatively quickly. If the body bounces any more than that after pushing, it's time for a new set.

You also need to know if your vehicle uses stand-alone shocks that attach to the vehicle suspension or frame, or if it uses shock-absorber units which integrated into a suspension strut, such as the MacPherson or Chapman strut. Your car may even have a combination, using shocks in the front and struts in the back. Struts can be difficult to replace, so it's best to let a professional handle that job.

2. Purchase new shock absorbers: If you're unsure what type of shock absorbers you need, speak to someone at your local auto parts store or an auto mechanic to be sure you buy the right shock absorbers or piston for your vehicle.

3. Consider upgrading your shocks: You can get identical replacements of the shocks you have in your car currently, but taking the time to change out your shocks is also a good opportunity to perform any upgrades, if you're interested. Performance shocks are appropriate for heavy-use daily drive vehicles, es 487 pecially trucks.

Coil shocks are manufactured with a coiled spring around the body of the shock, which supports the weight of the vehicle and controls the movement of the suspension. These are adjustable, which means you can alter the height of your truck for optimum performance.

Twin-tube shocks have a set of tubes, one inner and one out, that house the piston, along with a layer of shock fluid and air, which can have a tendency to create a foamy, frothy mixture that can affect performance, though some modern variations feature a nitrogen mixture that addresses the issue. These are common on off-road vehicles.

Monotube shocks feature a tube and two pistons, which work essentially like the twin-tube shocks work, with one piston separating the layer of nitrogen from the air. It runs cool and is a popular performance choice for trucks.

Reservoir shocks are filled with fluid, and either pressurized air or nitrogen. As the shock absorbs bounce, the fluid contacts the gas, causing 14ad resistance and dampening the spring action.

4. Jack your vehicle in an appropriate location: Park your car on a level surface and loosen the lug nuts on both sides of the front or back end. Secure your vehicle with ramps and/or jack stands. Check your owner's manual for the correct jack positioning. When you've got the car up, remove the wheels and locate the shocks.

Shocks will be affixed with a vertical bolt that has to be extracted from within the engine bay or the trunk, or may be positioned at the top by a horizontal bolt that has to be unfastened and knocked out of position.

5. Check the shock mountings and spray them with metal cleaner: The most difficult part of the job is removing the old shocks, which can have a tendency to be really gunky with both age and road-grit, making the bushings and bolts somewhat difficult to remove. Check out the mountings to see if they're loose enough to get off, or if you're likely to crack the rubber around the bushing. It's ok if you do, since you're changing out the shock anyway, but it's usually easier to spray some WD-40 or PB Blaster in there and let it sit for a few minutes to try to loosen things up before you get to work.

PART TWO
Removing the Old Shocks

1. Remove bolts from the shock tower: Lots of cars have the top bolts under the fabric in the trunk of the car, which means you'll have to lift up the lining to get to the shock bolts and remove them with a ratchet and socket. As always, consult your shop manual for more specific guidelines regarding the location of the shock tower bolts. In general, though, they'll be in the trunk.
To unfasten the bolts, turn the socket and ratchet counterclockwise, greasing the b a45 olts with penetrating fluid to eliminate any surface rust, if necessary.

2. Disconnect the shock from the suspension: Use a socket set or a nut splitter to disengage the nut that connecting the shock to the suspension, and remove it from the bolt. If there isn't enough room to operate the splitter, you can apply penetrating solvent.

Depending on the assembly, you may also need to disengage the knuckle at the top of brake assembly to get the the shock. Consult your owner's manual to find out for sure. Use the same process to remove the nut that is positioned at the top and keep the nuts separate so you will know which one goes where when it is time to install your new shocks.

3. Remove the shock absorber from the bottom and top bolts: Wiggling the shock off the bolts can be surprisingly difficult, especially if the shocks are mounted on studs with a retaining bracket and everything's rusty. Wiggle it around a while and it should come off eventually.

One common frustration occurs when your piston rod keeps turning with you as you're trying to loosen the nut. You can use locking pliers on the end of the rod and keep it from turning with the pliers while loosening the nut with a wrench, but that can be just as frustrating. There's a hollow hex kit that fits over the rod and a tailored wrench made for the purpose, available at any auto parts store for about eleven bucks.

If you need to bang on the bolt with a hammer or the end of your wrench to get it loose, that's ok, but make sure you put one the nuts back on to use as a hitting surface. Don't risk misaligning the bolt and messing up your ability to reinstall the shock properly. Let the metal cleaner do its work and take your time. It'll give.

Installing New Shocks

1. Fit the new shock back onto the suspension control arm: You might need to use some pressure to constrict the shock as it falls into place, and you might need a help to help lift the suspension back up to reinstall the bolts in the correct positions. It can be kind of a balancing act, so it helps to have another set of hands. Screw on the nuts hand tight.

2. If needed, you may once again affix the anti-roll bar if you removed it earlier: Reattach it and screw the bolts back on hand-tight. Replace the shock tower nuts you removed at the beginning of the process, probably in the trunk of the vehicle.

3. Check your torque specs in the service manual: Before you go tightening everything back down, recheck the specifications for torque to be sure everything's secure.

4. Repeat the steps to replace the other 3 shock absorbers, if necessary: Most of the shocks should wear out at the same time, so if you're going to do one, you're probably going to end up doing them all. Do in following the same steps and then put the wheels back on and tighten the lug nuts to finish the job.

Thursday, 27 October 2016

Do It Yourself (DIY) Tips: How To Change Your Brake Pads

Are you hearing a nasty screech when you press the brake pedal in your car? Does it sound like rock monsters are playing the world's loudest frame of bowling every time you need to slow down? Well, it may be time to change your brakes.


You will be pleasantly surprised to find that you can change your car's disc brake pads quickly, easily and without specialized tools. Doing it yourself also will save you a lot of money. But even if you're not interesting in doing this yourself, knowing what's involved makes it easier to understand what your mechanic may someday tell you.

Nearly all cars these days have front disc brakes. Front brakes usually wear out more quickly than the rear brakes (which could either be disc or drum brakes), so they need to be changed more often. You need to change brake pads when they get too thin, especially if they begin to make a persistent metallic squeaking or grinding noise when you press the brake pedal. But noise alone isn't always the best indicator, so it's best to anticipate when this will happen by periodically inspecting the thickness of the brake pads.

Note: If the front end of the car vibrates when you apply the brakes, your brake rotors may be warped. If the rotors appear grooved or uneven, they may be scored. In either case the rotors may also need to be replaced or "turned" on a brake lathe, a procedure not covered here. You may need a professional's help for this, but you can see what's involved in a rotor change by looking here.

Time Required: 1 hour

Tools Required

- Disposable mechanic's gloves to protect your hands and keep them clean
- Jack and jack stands
- Lug wrench
- C-clamp or length of wood to retract the piston
- Wrench (choose a socket, open end or adjustable wrench)
- Turkey baster for drawing out brake fluid
- Plastic tie, bungee cord or piece of string

Materials Required

- New brake pads — Since you are saving money by doing this yourself, you might want to consider splurging a bit by buying original manufacturer brake pads, which are more expensive.
- Can of brake fluid — check your owner's manual for the proper type.

A couple of things to note before you begin
Brake Pad

Know your calipers: 
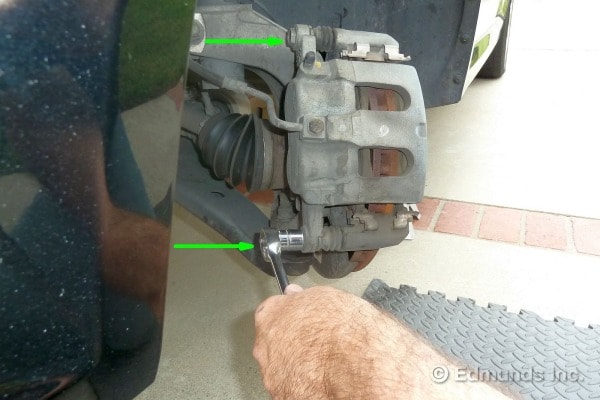
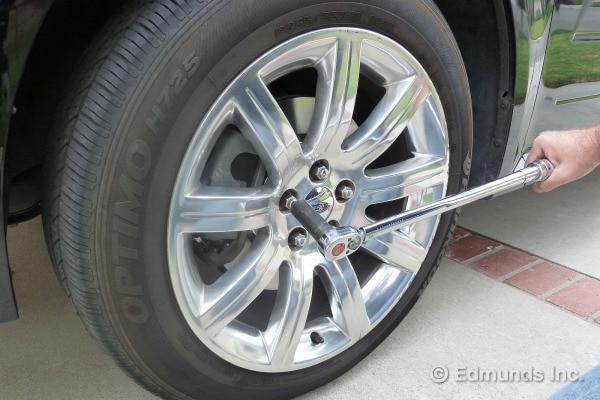
The majority of cars have a "sliding caliper" brake assembly. That's what's shown in the photo above. Compare this brake assembly to the one in your car. Other cars have "fixed caliper" assemblies. The pads in fixed-caliper brakes are also easy to change but the process is slightly different, so we'll cover it in another instructional piece.

Do one side, then the other: For reasons that will be clear later, you should change the pads on one side of the car from start to finish before doing the other side. Also, since you're doing one side at a time, turn the steering wheel so that the wheel you're working on is angled out for better access to the brakes.

Now we can get started.

Steps for changing your brake pads

1. Remove the wheel
2. Remove the slider bolt
3. Pivot the caliper up
4. Slide out the old brake pads
5. Replace the retaining clips
6. Slide in the new brake pads
7. Retract the pistons
8. Monitor the brake fluid level
9. Reposition the caliper
10. Reinstall the slider bolt
11. Repeat for the other side
12. Test-drive under safe conditions

Remove the wheel
Brake Pad
Loosen the lug nuts on the wheel. Then jack up the car and place a jack stand under the car's frame. Lower the jack so its weight rests on the jack stand. Fully remove the lug nuts and remove the wheel. You now have access to the brake assembly and can safely reach under the car.

Remove the slider bolt
Brake Pad

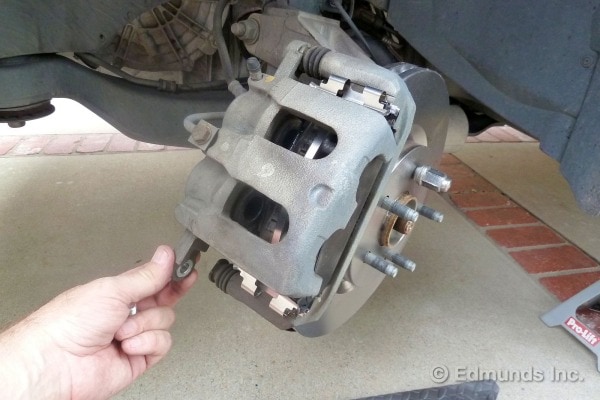
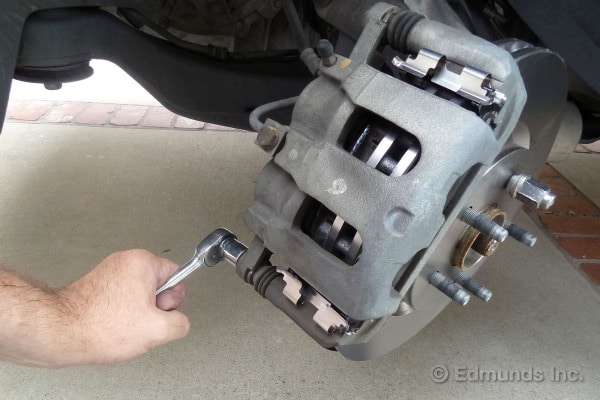
Find the two slider bolts (sometimes called "pins") that hold the caliper in place. On this car, a 2009 Ford Flex, the bolts are on the inside. The arrows in the photograph above point them out. It's generally only necessary to remove the lower bolt. It can be long but once it is fully loosened, it will slide out easily.

Pivot the caliper up
Brake Pad

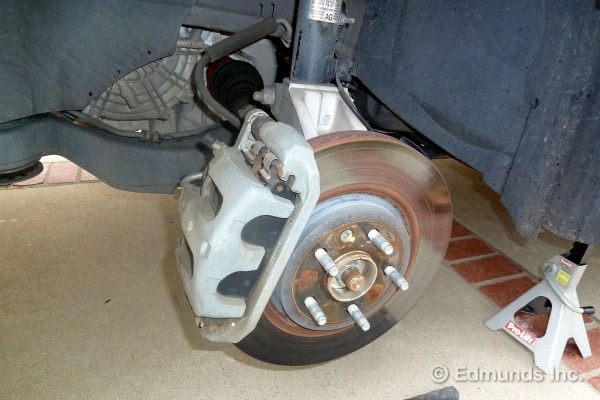
With the bottom bolt removed, the caliper pivots up, as shown in the photograph above. The rubber hose, which is the hydraulic line, will flex to allow this so do not disconnect any hydraulic lines. If you think you have to disconnect a hydraulic line, you're doing something wrong. Reassemble the brakes and seek professional help.

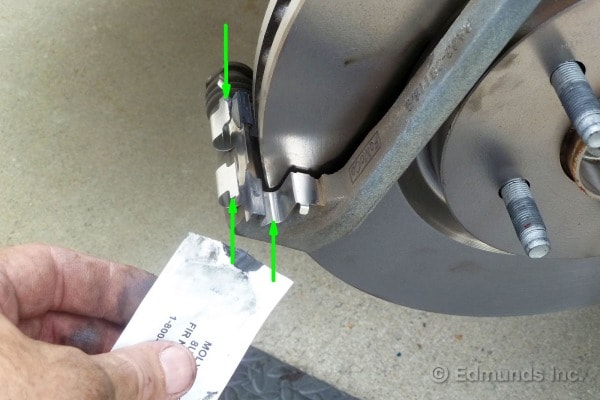
At this point, it is very easy to inspect the thickness of the brake pads to confirm that they need to be changed. Most brake pads have metal wear indicators, which are small metal tabs that squeak when they contact the rotors. Even if these are not yet touching, the pads are worn out if the friction material is 1/8th of an inch thick or less at any point.

Slide out the old brake pads
Brake Pad
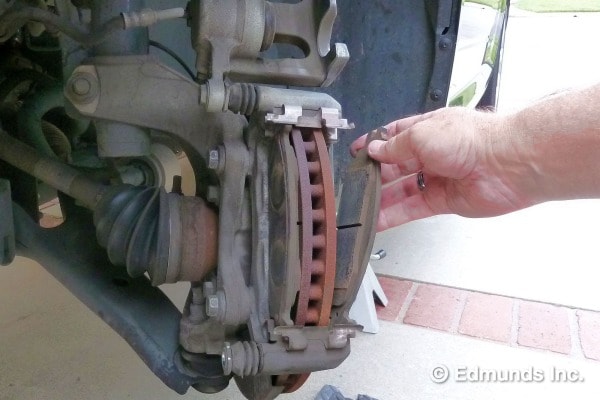
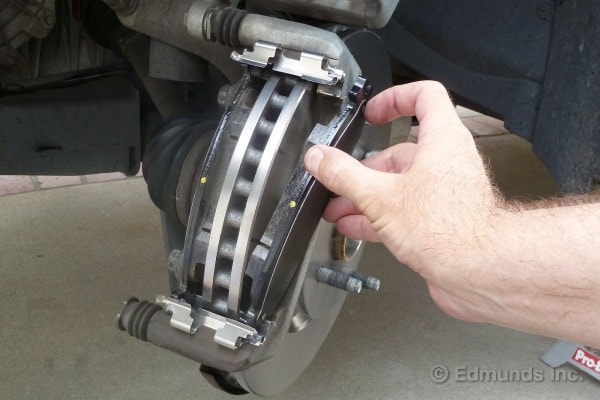
The brake pads are now exposed and the retaining clips hold them loosely in place. Simply slide the old brake pads out, as shown in the photo.

Brake Pad

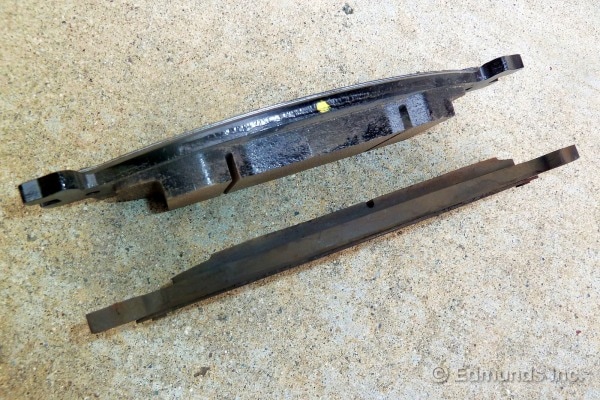
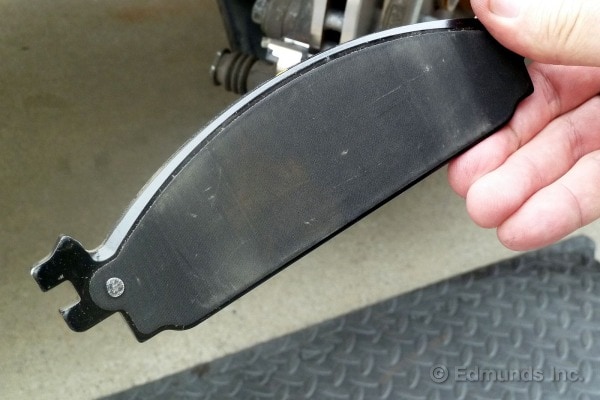
In the above photo, you can see a comparison of the new, thicker brake pad (top), next to the old, worn-down brake pad (bottom).

Replace the retaining clips
Brake Pad

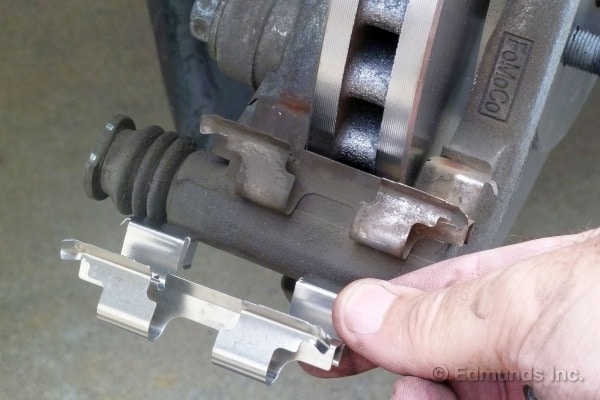
The photo above shows the pad's new retaining clips. New pads almost always come with new clips, which allow the pads to slide back and forth easily. Use the new ones and chuck the old ones. There are no retaining screws for the clips. They just snap in place. There are usually left-handed and right-handed clips, so change one at a time, making sure they match up exactly as you go.

Brake Pad
Often, a small packet of graphite-based grease will come with the brake pads. Apply this to the clips of the new brake pads to keep them from squeaking, as shown in the photo above.

Brake Pad
This photo shows that the new brake pad has a riveted-on shim, which is the thin metal plate. Some brake pads might have unattached shims that have to be temporarily held in position until you lock the pads in place. The "ears" are the metal tabs on either end of the brake pad (only the two left ears are visible here). These ears fit into the slots in the clips. Some of the grease can be applied to the ears and between any loose metal shims, too.

Slide in the new brake pads

Brake Pad
The new pads slide into place as easily as the old ones did when they came out, though sometimes the new clips will be tighter. The ears of the new pads should slot nicely into place on the grease you applied.

Retract the pistons
Brake Pad

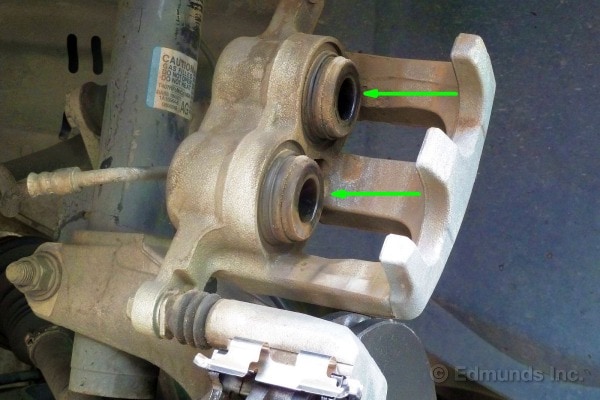
In the photo above, the arrows point to the pistons. These pistons press on the brake pads and squeeze the rotor to stop the car. Your car might only have one piston for each wheel, but the principle is the same. Before you can lower the caliper into place, these pistons need to be retracted (pushed back) so that they will clear the new, thicker brake pads.
Brake Pad
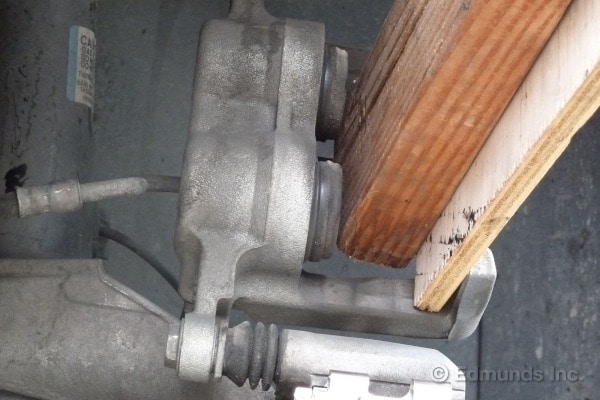
Do-it-yourselfers often use a C-clamp to retract the piston or pistons. In this case, we simply levered the piston back using a 2x4 and a piece of plywood. By doing this, the brake fluid in the pistons is being pushed back into the master cylinder reservoir through tiny passages, so the pistons move slowly. The width of the 2x4 allows both pistons to be pushed in at once. If you pushed in one by itself, the other would pop out — you don't want that. Fortunately, most cars have just one piston per caliper, which makes things far simpler. Either way, steady pressure and patience are key here. In this example, we added a second plywood shim near the end of the process to fill the ever-increasing gap. Throughout, take the utmost care to ensure you don't nick or tear the rubber boot and seal that encircles the pistons.

Monitor the brake fluid level
Brake Pad
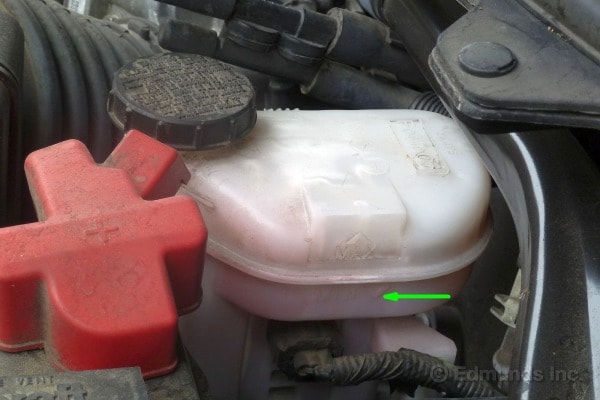
When you push the pistons back, the brake fluid level slowly rises. Open the master cylinder reservoir and check it often. This is more of a concern when you work on the second brake, because the combined fluid volume of two calipers could cause the brake fluid to overflow. If it looks like this is going to happen, suck out some of the brake fluid with a turkey baster. There is more danger of overflowing if someone topped off the fluid level during regular service visits. (This is why the brake fluid reservoir shouldn't necessarily be topped off like that.) The fluid level naturally goes down as the pads wear. And it comes back up when the pads are replaced. As long as the level doesn't go below "MIN," the arrow shown in the photo above, on the lower half of the reservoir, everything is cool.

Reposition the caliper
Brake Pad


With the pistons retracted, the caliper should slip over the pads with little effort. Sometimes the fit is tight and the caliper will slide on the newly installed brake pads. If the pistons catch on the brake pads, you might need to check that you retracted the piston completely.

Reinstall the slider bolt
Brake Pad
Reinstall and retighten the slider bolt. Straighten the car's wheels, re-mount the tire and tighten the lug nuts.


Repeat for the other side

Repeat all these steps for the other side of the front brakes. Remember that the brake fluid will be higher in the reservoir now that new pads are installed on one side, so keep your eye on the fluid level as you retract the piston on the other side. The fluid will only rise further the second time around. You don't want it to overflow since the brake fluid is highly corrosive. If it looks as if the fluid will overflow, suck some out with the turkey baster. If the level is below the "MAX" when both sides are done, add fresh fluid to top things off to the line.

Test-drive under safe conditions

Test-drive the car under safe conditions to make sure everything is working properly, being especially careful for the first few stops. Be aware that your brake pedal might have a higher engagement point. You will quickly get used to this change. Enjoy using your new brakes knowing there are now thick brake pads to stop you safely.